
As someone who is somewhat recipe obsessed- not in terms of following and trying new recipes, but in reading them and gleaning tips and tricks and methods to improve my cooking and baking, when I came across a sourdough sandwich bread recipe the other day with a different method...I knew I needed to play around with it.

My Sourdough Sandwich Bread is a weekly bread for so many families and for that, I am honoured. I am tagged on Instagram on a daily basis in peoples' baking posts and it never ceases to thrill me.
The ingredients in this recipe are basically the same, albeit in slightly different measurements. It's also measured in cups not grams, which many find so much more approachable and easier to get into sourdough baking without the added step of figuring out weighing ingredients too.

What's different is the method: you're going to mix up your starter with specific measurements the night before. Many refer to this as a levain, pre-ferment, sponge...if that feels overwhelming, just think of it as feeding your starter a specific amount, because that's all you're really doing.
Next is the proofing. You've got an overnight variation or a "make it one day" variation. For the make it one day method; it doubles and you punch it down after 2-3 hours and then let it rise another 2-3 before shaping. You may be saying but Kate - never has my dough ever been ready to shape after such a short time! I'm here to tell you, my dough, which is NEVER ready to shape after such a short time...is ready after such a short time. Like, hold my beer and watch this. Even if my house is cold, it still works. If my house is like REALLY cold...I'll turn the oven on for a minute, turn it off, then put the shaped bread to rise in there.
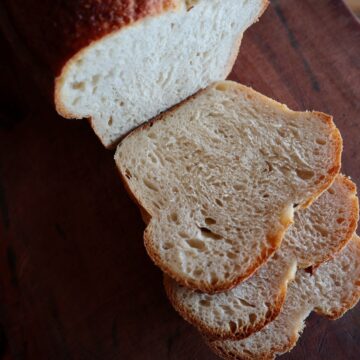
The next drastic change is the temperature. For those who have struggled with dark crusts and dark bread at high temps; breathe a sigh of relief, this bakes at 375F. After it comes out of the oven, I slather the top in butter and leave it in the pan to cool. The bread 'sweats' in the pan a bit and softens the side crusts. It's not as sweaty as it sounds, I promise, it works well.
Now the REAL magic in this recipe...is that without needing to be heavily enriched with eggs, oil or sugar...it's soft enough to make cinnamon buns, french bread, and dinner/sandwich buns. Yes friends, one recipe, FOUR ways to bake it. And I'm not done experimenting. I have more up my sleeve.
While I love the original sourdough sandwich bread recipe, it's not super versatile. It's a loaf of bread only. This is the sort of recipe I need. One that I can make over and over and use it all sorts of ways. One that doesn't require loads of butter or eggs to make soft cinnamon buns. A loaf of french bread for soup. A dough I can make a big batch worth and make it a few different ways: some buns to go with dinner, cinnamon buns for a treat, and a loaf of bread for tomorrow.
Your starter to make the preferment needs to be fed somewhat recently, but it can be falling/needing to be fed. It doesnt need to be at optimal bread baking state.
The recipe is written to make one loaf, but if you hold your mouse/tap your finger over the recipe card where it says "servings: 1 loaf," a little slider should pop up where you can adjust it to fit your needs. While I never make just one loaf, it made the most sense for using the dough for other variations to write up the master recipe as one loaf's worth of dough.
OVERNIGHT TWEAKS - In my extensive testing of this recipe, I have found if you are doing an overnight rise, you can skip the autolyze rest before kneading AND skip the first punch down and rise. Just let mix, knead, let it rise, punch down and shape in the morning.
EXCESS EGGS IN YOUR HOME?! You can swap ¼ cup of milk for an egg! Add the egg in step 3. It adds an awesome boost to your dough and when you've got extra eggs, why not?!
Kate's Soft Sourdough Master Recipe
Ingredients
Pre-Ferment
- ½ cup sourdough starter it needs to have doubled, but can be falling and needing to be fed, it does not need to be at 'optimal bread baking state'
- ½ cup warm water
- ⅔ cups all-purpose flour
Dough
- Pre-ferment from above
- 1 tablespoon butter, coconut oil or olive oil
- 1 tablespoon honey sub 1 tablespoon honey for 1 tablespoon maple syrup or 2 tablespoon sugar
- 1 teaspoon salt
- ¾ cup milk (save buttermilk from making butter for this if you have it!) sub non dairy milk or yogurt/cultured buttermilk watered down to to milk consistency.
- 2 ¼-2 ¾ cup all purpose flour
- Butter to brush crust after baking
Instructions
- I recommend reading the blog post before the recipe, there is some different steps here that may feel confusing, but are explained in the post. Happy Baking!
Pre-ferment
- Mix the pre-ferment of sourdough starter, flour, and water up 8-24 hours before you want to bake. The longer beforehand, the more sour your end product will be. If I plan to mix the dough in the morning, I make it before bed. Cover with plastic wrap or a plastic bag and let sit on the counter.
To Make the Dough
- Melt butter, honey, and salt on low in a saucepan. When it's melted and combined, turn off the heat, add your milk, and stir to combine. With a thermometer or your finger, test the temperature of the mixture. By thermometer, it should be no more than 105F. By your finger...you should be able to comfortably hold it in for 10 seconds. If it's not this warm, turn the heat back on to warm it. If I use a heavy bottom pot, there is enough residual heat to heat the milk, if I use something like a thin enamel pot, there isn't.
- Add the warm liquid to your mixer (or bowl you plan to mix the dough in) and add your pre-ferment.
- Stir to combine; it's not going to combine super well until you start adding flour.
- Add your flour, starting on the low end, and mix the dough, adding more flour as needed just until it's combined, but not a cohesive, nice dough.
- Let sit 15-30 minutes, then knead the dough.
- This dough takes more kneading than most- my mixer kneads on low for 10 minutes, so if kneading by hand, you're going to knead about 10-15 minutes.
- If the dough sticks to the bowl or your hands, add a little more flour, but try not to add too much. It's not a stiff dough, it's on the softer side. Try wetting your hands/counter for kneading if it's sticking and you've already added a lot more flour.
Bake in One Day Method
- Cover your dough with plastic wrap or a plastic bag and let rise 2-3 hours until it looks like it's kind of doubled (don't overthink it, as long as it's 1.5'd its original size).
Overnight Method (see notes)
- Cover your dough with plastic wrap or a plastic bag and let sit overnight. It will be gigantic and beautiful in the morning. Skip the second rise with the overnight method. see notes
For Bake in One Day Method: Continue as Below
- Punch your dough down, give it a few kneads. Yes, you are letting it rise twice before shaping. For more on this, read the blog post above the recipe card.
- Cover with plastic wrap or a plastic bag and let sit 2-3 hours until it's doubled. To test if your dough has doubled, dip your finger in flour and poke the dough. If the dough bounces back- it's got more to give and needs to keep rising. If the dough stays indented, it's given all it has to give and you can proceed.
To Shape your Loaf
- If you're using this recipe for French Bread, Cinnamon Buns, or Normal Buns, this is where you switch over to that recipe. To use as sandwich bread, proceed as follows.
- Dump your dough onto a lightly floured counter, press out with your hands to make a rectangle roughly the size of your two hands flat, side by side (roughly 6"x10"). Fold the dough like you were folding a piece of paper to go in an envelope, flip seam side down and let rest 10 minutes.
- This is called a bench rest or par-shape. It helps your dough keep shape in its final shape and your loaf of bread will be taller.
- After ten minutes, flip the dough seam side up, flatten out to the same size. This part is funny to describe but fold your rectangle so it's now a triangle, and then starting at the point of the triangle roll it inwards. When it's all rolled up, tuck any non-conforming parts in to make it a good size to fit in your loaf pan. Pinch the seam together, flip seam side down onto a piece of parchment paper. Pop it into your loaf pan.
- Cover with a tea towel and let rise 2-3 hours, until it's doubled. If your house is like REALLY cold- 60F or lower...I suggest turning your oven on for a minute or two (put a cast iron pan in there to hold some heat!), turn oven off, then put covered loaf pan in the oven to rise.
- When it's doubled and ready to bake, (don't forget to take it out of the oven!) preheat oven to 375F.
- Slash the top of the dough with a sharp knife to allow for expansion.
- Bake for 20 minutes, flip around and bake another 20 minutes.
- After the second round of 20 minutes (40 min total) check the internal temp of your loaves- this is the most reliable way to know your bread is ready. Your bread should be 190-200F, if not put it in for another 5 minutes.
- When your bread is done, take it out of the oven, leave it in the loaf pan to cool, and brush butter on the top. This can be melting and using a brush or just rubbing a stick of butter over the top. This step is technically optional but it REALLY makes a nice soft crust that stays soft.
- Now the easy part...enjoy your bread! I prefer to slice it all right away. Anything you wont eat within 2-3 days pop in freezer in a bag once its cooled.
Notes
- OVERNIGHT TWEAKS - In my extensive testing of this recipe, I have found if you are doing an overnight rise, you can skip the autolyze rest before kneading AND skip the first punch down and rise. Just let mix, knead, let it rise, punch down and shape in the morning.
- EXCESS EGGS IN YOUR HOME?! You can swap ¼ cup of milk for an egg! Add the egg in step 3. It adds an awesome boost to your dough and when you've got extra eggs, why not?!
Christine E
I LOVE this recipe! I have been making it most days for a few weeks and it's wonderful. Today I was adventurous and after the preferment was done, I used freshly milled red hard wheat for the rest of the recipe, threw in a tablespoon of sunflower lecithin, and the rolls were so puffy, soft, fabulous! Not sure if the lecithin is necessary or of an egg would have the exact same effect, I could keep experiencing but honestly it was so good I don't know if I want it to be any different.
[email protected]
Wow this sounds great!
Ruth Haynes
This bread is amazing! I'm wondering if it could be made with whole wheat flour?
[email protected]
Yes, it can but you will have to fiddle with the amount of liquid and flour. Might not get the same rise either.
Crystal
You said the dough is soft.... how soft? I don't have a lot of experience with sourdough. I didn't over-add on the flour and my dough is resting now. It does not hold its shape. It flops in the bowl. Does that seem right or does it need more flour?
[email protected]
I think it sounds like it needs a bit more flour. I also found that how warm my house was for the overnight rise and subsequent rise made a big difference. Kate tested this recipe extensively before releasing and I've seen her make it in person. I think those of us with less experience just need to find that groove. Sorry that may not be specific enough to help you. In spite of it all I still love this recipe for cinnamon buns, hamburger buns etc.
Suzanne Stack
I have my first ferment going and now have made my first loaves...ever! So delicious and love the texture.
With regular yeast white bread I can make the dough, shape and freeze it. Warm/rise/bake another day. Can I do this with this recipe?
[email protected]
Sourdough does not respond well to being frozen before baking. Best to bake then freeze.
Evelyn Rizzo
I need the recipe for the starter to begin with. Thank you. ??
[email protected]
I'm sorry Kate doesn't have a recipe to share exactly. There are a lot of recipes online but the basic premise of starting with good fresh flour and water is standard. The main thing to remember is its going to take at least four days and you want to keep it on the counter is a warmish spot, covered with a piece of cotton or a lid sitting on top but not screwed down.
Start with about 2 tablespoons flour and a bit less than that of water. Each day (approx 24 hours) you are going to stir in down and add flour equal to the amount of "starter" in your jar and a bit less than that of water. It should be a muffin batter consistency. You are aiming for seeing bubbles and your starter doubling. When you get more than 1/2 cup of "starter" you are best to discard extra so you are only "feeding up" a small amount. Once your "starter" doubles within 24 hours it is good to go.
I've been using the same starter that Kate gave me in about 2016 and even when I go away for a month I'm still able to revive it using this method.
Joanne Anhelher
I followed your recipe, and found it had a strong sourdough taste and smell.. is this how it’s supposed to be or did I do something wrong? My starter does not smell strong, it’s very mature. Please advise!
Thanks Joanne
[email protected]
Usually a longer ferment means a more tangy flavour. I don’t think you did anything wrong per se just maybe try shorter ferment time with your lovely mature dough?
Kadie
Mine did too! The texture, and everything was PERFECT! Definitely didn’t ferment it long. I did the minimum. But the sour is soooo strong. It’s odd. Lol. Still lovely nonetheless! I think I’ll try sweeting it with monk fruit next time and see if that makes a difference! Best recipe I’ve tried yet though!!
Daisy
Do you think doubling the recipe would make a loaf big enough for my large Pullman pan?
[email protected]
We are sorry for the very delayed response! Kate says that she has never used a pullman pan. She suggests to see how much dough it says to use in weight and then weigh a batch of dough.
Molly
Hi Joanne! Have you tried the one day recipe or just the overnight method? The one day turned out MUCH less sour for me!
Maggie
This came out so great for me - thank you! Finally I had good success with a loaf bread - lol. I used a very small amount of spelt flour (1/3 cup or so) to see how it would be - fantastic! The rise was so good. Thank you for a wonderful recipe and good explanation. Can't wait to try your other recipes with this master dough.
[email protected]
It's great to know it worked with with a bit of spelt.
Jordyn
For same day bake am I letting it ride, punching it, letting it rise, shaping it, and then letting it rise again? Or letting it rise, punch it, shape it, let it rise?
[email protected]
Yes, for same day baking you are letting it rise 3 times. I've never done same day but Kate regularly does. (sorry for the delay in getting a reply from someone over here!)
Teresa
It was delicious and by far the easiest to make yet.
Helen Bartow
LOVE THIS BREAD RECEIPE,REALLY SOFT,HAVE BEEN MAKING BREAD FOR YEARS BUT SOURDOUGH IS A WHOLE DIFFERENT KIND OF BREAD,CAN BE TO0 HARD,CRUNCHY ,TOUGH ETC.I AM 80 YEARS OLD AND WAS JUST ABOUT TO GIVE UP ON KEEPING MY SOURDOUGH STARTER ANYMORE.THANK YOU FOR GIVING US THIS WONDERFUL BREAD RECEIPE.i am going to add sage using it for my stuffing/dressing for my turkey .
[email protected]
I've been making it for my mom who is in her 80's because it's got a nice soft crust. It's a great bread!
Mandy Bewhey
Is there a version from grams instead of cups for measurements?
[email protected]
Not at this time. Sorry....a lot of people still like to use imperial measurements so that's why there are a few of them in Kate's recipes.
Martha Scheidecker
I am new to sour dough and I am new to Ruthann Zimmerman who posted a video of your recipe. What I would like to know is how do I make the starter for your recipe of soft sour dough bread.? The recipe starts with a starter and then adding the required ingredients to it. Where does the starter come from for someone who has never made it before?
Thank you for sharing!
[email protected]
I'm sorry Kate doesn't have a recipe to share exactly. There are a lot of recipes online but the basic premise of starting with good fresh flour and water is standard. The main thing to remember is its going to take at least four days and you want to keep it on the counter is a warmish spot, covered with a piece of cotton or a lid sitting on top but not screwed down.
Start with about 2 tablespoons flour and a bit less than that of water. Each day (approx 24 hours) you are going to stir in down and add flour equal to the amount of "starter" in your jar and a bit less than that of water. It should be a muffin batter consistency. You are aiming for seeing bubbles and your starter doubling. When you get more than 1/2 cup of "starter" you are best to discard extra so you are only "feeding up" a small amount. Once your "starter" doubles within 24 hours it is good to go.
I've been using the same starter that Kate gave me in about 2016 and even when I go away for a month I'm still able to revive it using this method.
Audra Trosper
You mentioned in your video that you used a larger recipe that made four loaves. I need the larger recipe.
[email protected]
Just above where the ingredients are listed there is a button where you can choose 1x, 2x, 3x the recipe. Hope this is helpful.
Becky
This was awesome, soft and delish. I’ve been making artisan loaves since 2017 but didn’t realize sourdough could produce such a soft pan loaf. Thank you for sharing??
Edith
I’m sorry but I’m lost. How do I make the starter for the 1/2 cup starter requirement?
[email protected]
I'm sorry Kate doesn't have a recipe to share exactly. There are a lot of recipes online but the basic premise of starting with good fresh flour and water is standard. The main thing to remember is its going to take at least four days and you want to keep it on the counter is a warmish spot, covered with a piece of cotton or a lid sitting on top but not screwed down.
Start with about 2 tablespoons flour and a bit less than that of water. Each day (approx 24 hours) you are going to stir in down and add flour equal to the amount of "starter" in your jar and a bit less than that of water. It should be a muffin batter consistency. You are aiming for seeing bubbles and your starter doubling. When you get more than 1/2 cup of "starter" you are best to discard extra so you are only "feeding up" a small amount. Once your "starter" doubles within 24 hours it is good to go.
I've been using the same starter that Kate gave me in about 2016 and even when I go away for a month I'm still able to revive it using this method.
Lori L Silva
If I was to try this recipe, being a newbie at this, can I make a fresh starter or should it be a certain age (days old)? I've never made a starter before and am petrified of failing at it.....I have half gallon jars full of homemade bread crumbs! LOL... I am anxious to try this but I also have time to spare should I need to let my new starter age a little..Thanks for any and all help out there!! All the best!
[email protected]
I would get your starter going and do a few rounds of feeding and discarding. But remember for this recipe the starter does not need to be perfect. It's about the pre-ferment doing the heavy lifting. Sorry for the delay in replying, but hope this helps.
Kadie
I’m so excited to try this recipe with the fact that it’s so versatile! Question, would this recipe work for English muffins?! Thanks!
[email protected]
I think you need a firmer Dough for English muffins but if you try it out let us know!
Chrissy
Even after using the larger flour amount, my dough was so sticky. Any idea why? It was even super sticky after the second rise when I went to make my loaves on my floured counter. I had to sue a TON of flour to keep it from sticking all over the place. Help! 🙂
[email protected]
Depending on the flour it can affect the hydration of the dough. I've had to use more flour as well. Trying to find that sweet spot of just the right amount is worth it. I make sure the dough is the right hydration before I cover it for the first rise. Hope that helps.
Rylee
I’ve made this approximately 5 times & every time it has turned out beautifully. I’m not one to have consistent results with recipes so to have this come out great every time says a lot. It’s a great sandwich bread for my picky child who prefers the yucky store bought bread. It slices wonderfully, doesn’t fall apart & freezes well.
[email protected]
Wow you really have nailed it!!
Christine Anderson
Do you double and triple the amount for master recipe? or is that link broke? Example, add to previous left over starter 1/2 c water x 2 =1 cup and 2/3 cup flour x 2 =1 1/3 of flour. Or, do these amounts stay the same even if you are doubling or tripling the original master recipe?
Thank you
Christine Anderson
[email protected]
Yes, you are right the link broke! Sorry for the confusion and for the delay in replying.
K
Decided after reading this over and over to start. Total time says 6 hr 45 min.
However I'm seeing 3 sets of rises.
Make dough, cover, rise 2-3 hr, punch down, knead, rise again 2-3 hr, shape... Then rise again 2 hours in loaf pan until double then bake.
Of I add the mixing of ingredients,(5 min or so to heat milk, mix),autolyze 30, knead 10..then I'm adding roughly 45 min on top of 6-8 hrs rising,then baking... Close to 10 hours.
Is my math way off for same day bake??
Thanks for any help. I'm new to figuring out timing
[email protected]
I'm not 100% sure but I'm quite sure the time of 6 hours 45 minutes is the rising and baking times. Kate uses a recipe generator to get the recipes standardized but it might not be representing the active time you need to complete this recipe.
So the short answer is no, I don't think your timing is off for total time for one day from start to finish.
Tami O'
Does the overnight rise require refrigeration, to prevent over proofing?
[email protected]
No it does not, but you definitely don't want it sitting by the warm fire overnight. Kate also said you could skip heating up the milk and that would keep the dough from rising too quickly. Been there done that!
Terrenia Porter
How many loaves does this recipe make?
[email protected]
This recipe makes one loaf of bread.
Nancy
Friggin' nailed it! Thank-you!
Kasonya T.
This recipe is the first version of sourdough that my family enjoys. To be honest, it's the first I actually enjoy, too, & not eat just because it is good for me. Thank you so much!
[email protected]
Yes, I love this recipe too!! Glad it's a hit with your family.
Caity
This recipe is magic. I have failed every single time I have tried to make a loaf, boule, or buns - sourdough *and* packet yeast - and I was so sure this wouldn't turn out. I forgot to add the egg until I had added all the flour and it looked incredibly sloppy and yet, through some sort of recipe magic, I pulled my very first successful loaf of bread out at the end of the steps. It was great and half was devoured within hours of baking. I made it into buns the next day and that tip from your video for shaping them by rolling them with your hand also worked like a charm. Cait to Kate, thanks so much for sharing the recipe and all the great notes.
[email protected]
I love how the "magic happened" for you! Well done!
Pam
Why not use BREAD FLOUR instead of all purpose? I’m about to try this recipe and wondering why all purpose is used and how bread flour may affect the recipe?
[email protected]
Ive never used bread flour and neither has Kate. I think you need to look at the ingredients of bread flour and go from there. All purpose works really well for this recipe.
Jeanette Moss Mccurdy
I’m new to making sourdough and have had to double the starter amount when making boules due to winter temperatures. Should I do that with this recipe? And if so, would I double the whole preferment or just the starter amount?
[email protected]
Kate says "I'm not quite sure what you mean but for the preferment it is quite a big one for the loaf size and if you use warm water you should be fine"
Rachel
I really like this recipe! I have not gotten the overnight version to rise very well in the loaf pan...even waiting 3-5 hours! The bread always comes out more like English muffin consistency. The "bake in one day" version is much more fluffy/light in my experience.
[email protected]
If you do the overnight method, Kate told me recently, don't warm up the milk mixture before pouring it into the bowl. I had the same issue.
Teresa
It was delicious and by far the easiest to make yet.
Carol
This master recipe is exactly what I was looking for. I made flatbreads with it. They turned out perfect, nice and soft. Some of them puffed up like pita pockets. I've also made baguettes, cinnamon buns and loaf of bread.
[email protected]
Wow, I love all the things you've made with this recipe!
marilynm
Thought it was really wet but did it turn out great!!!)!
KC
How many loaves does this recipe make please?
[email protected]
The preferment made with 1 cup starter etc makes two loaves of bread.
Denise
Would the oven temp and time baked be different if I am using a dutch oven?
[email protected]
Oven temperature should not change and the baking time would almost be the same. I think this is something you will have to experiment with though.
Lu
Love this recipe - it is my husband's favorite sourdough - once I made this recipe, he asked me stick with this one ONLY! 🙂
[email protected]
That's awesome!
Maggie
I'm obviously doing something wrong here. Help.
Over night in the fig produced a beautiful dough with lots of bubbles and it felt grand!!
Did the shaping, resting and folding and have put the pans in the over set for proofing.
However, it seems to be having a rest cos very very little is happening. Hmmm. Wonder why after being such a beauty this morning.
Has now been in the oven for three hours...........is there hope?
[email protected]
Kate has suggested not heating up the milk. This is not uncommon for people to experience this.
Maggie
Hello,
I seem to be having difficulty in getting the bread to rise once it is shaped. It has now been in the oven proofer for seven hours with little change in its shape.
Perhaps I am being impatient but it was such a beautiful dough this morning after a night in the refrigerator. Soft and full of life. Ever hopeful I shaped it and waited..........and waited............and...........
Am I doing something wrong?
Interestingly, the first rise took a while to get going too.
[email protected]
Try next time making it without heating up the milk. That should help.
Shawna Conley
I would love to try this recipe out as I absolutely love sourdough bread but I don’t have any sourdough starter to begin with. How do I make a sourdough starter? Please help me begin my first bread making process with your incredible recipe for sourdough bread. Thank you for sharing your recipe and for explaining everything so thoroughly! I’m extremely grateful for your tips!
[email protected]
I'm sorry Kate doesn't have a recipe to share exactly. There are a lot of recipes online but the basic premise of starting with good fresh flour and water is standard. The main thing to remember is its going to take at least four days and you want to keep it on the counter is a warmish spot, covered with a piece of cotton or a lid sitting on top but not screwed down.
Start with about 2 tablespoons flour and a bit less than that of water. Each day (approx 24 hours) you are going to stir in down and add flour equal to the amount of "starter" in your jar and a bit less than that of water. It should be a muffin batter consistency. You are aiming for seeing bubbles and your starter doubling. When you get more than 1/2 cup of "starter" you are best to discard extra so you are only "feeding up" a small amount. Once your "starter" doubles within 24 hours it is good to go.
I've been using the same starter that Kate gave me in about 2016 and even when I go away for a month I'm still able to revive it using this method.
Bonita Fero
It seems to me that the dough should be left in bowl on the counter overnight and not be refrigerated. If it should be refrigerated over night, my Bad.
[email protected]
Nope you are right, the recipe does not say to put it in the refrigerator
Amy Reed
Question about the pre ferment… I have, at this moment, and active fully risen starter ready to bake with, it was fed with all purpose and flour. Do I still need to do another feeding as your recipe says? Also, how long must it sit after mixing up the pre ferment part? I don’t want my rolls especially sour. Can I use soon after mixing up the preferment mixture?
[email protected]
As soon as the preferment doubles, just like a starter. This depends on your house temp, your starter activity, your water temp, the flour you use…so I cant give an exact time but if you have active starter and use warm water you should be able to use it within 6-8 hrs. (Sorry for the delayed reply!)
Judith Rice
I have always wanted to try making sourdoughbread,and after finding out that Kate made it and her fam. all loves itI am going to give it a try also.Thank you for sharing.I follow kate very closly.I have also made her comfrey salve and now have Comfrey growing in my garden.
Kevin Greybill
Kate, in your overnight method where it states to cover the dough with wrap and let set overnight. Do you mean to let it sit on the counter or the refrigerator? Thanks!
Kevin
[email protected]
Yes, let it sit out on the counter covered.
Jeanie
Tried it but my bread was really heavy, dense
[email protected]
If you are doing the overnight rise, Kate suggests that you don't have to heat up the milk mixture. This helps it not rise too much the first time. It's a lovely recipe once you get going on it. I know it took me a few rounds to figure it out.
Melissa Boyd
This recipe can also work using freshly milled whole wheat flour increasing liquid or deceasing flour amount to get the desired consistency (soft, elastic, slightly sticky)
Jen
What does it mean by Flip the loaf? And are you baking in a loaf pan or Dutch oven?
[email protected]
You can bake this in a loaf pan or dutch oven, but usually a loaf pan. 'Flip the loaf seam side down' refers to making sure the seam is on the bottom of the pan for baking.
Florence Brown
I did the same day bake, I started about 7 am - did 2 rises. It was finished baking around 8 pm. The bread did rise, it was pale in colour and It had a big crack on the side….Why? I did put slits on the top
[email protected]
Kate's suggestion is it needed bigger/deeper slits on top and maybe your oven just didn't brown it as much?
Patricia
I need the starter recipe?
[email protected]
I'm sorry Kate doesn't have a recipe to share exactly. There are a lot of recipes online but the basic premise of starting with good fresh flour and water is standard. The main thing to remember is its going to take at least four days and you want to keep it on the counter is a warmish spot, covered with a piece of cotton or a lid sitting on top but not screwed down.
Start with about 2 tablespoons flour and a bit less than that of water. Each day (approx 24 hours) you are going to stir in down and add flour equal to the amount of "starter" in your jar and a bit less than that of water. It should be a muffin batter consistency. You are aiming for seeing bubbles and your starter doubling. When you get more than 1/2 cup of "starter" you are best to discard extra so you are only "feeding up" a small amount. Once your "starter" doubles within 24 hours it is good to go.
I've been using the same starter that Kate gave me in about 2016 and even when I go away for a month I'm still able to revive it using this method.
Melissa
This is my favorite sandwich bread recipe! This recipe is versatile and has even worked well for me using 100% freshly milled whole wheat flour! Thank you, Kate!
HP
What size loaf pan?
[email protected]
Just your standard 9x5 inch size works.
Pam J Brown
Good morning, I have made this bread twice. My rise is good but not soft on top more bubbly like my feed starter. As I move forward with steps in recipe my bread ends up dense and low not rising over top of bread pan.
Please help!
Pam
[email protected]
One suggestion Kate has made is if you are doing the overnight rise, skip heating up the milk. I know this has worked better for me. As well she thinks you maybe over proofed the dough in the first round.
Gretchen
I am new to baking bread and don’t understand the shaping and folding instructions. Is there a video showing how to shape the loaf?
[email protected]
If you watch this video of Kate's friend's, she shows how to shape bread at 29:16 minutes
https://www.youtube.com/watch?v=B8o18K7ycuw&t=1950s
Sharon
First sourdough loaf I made - easy and amazing flavor without the hard crusts! I’ll make again and try the other options as well.
[email protected]
Wow, well done you!! I'm impressed.
Dee
Where do I get the starter?
[email protected]
I'm sorry Kate doesn't have a recipe to share exactly. There are a lot of recipes online but the basic premise of starting with good fresh flour and water is standard. The main thing to remember is its going to take at least four days and you want to keep it on the counter is a warmish spot, covered with a piece of cotton or a lid sitting on top but not screwed down.
Start with about 2 tablespoons flour and a bit less than that of water. Each day (approx 24 hours) you are going to stir in down and add flour equal to the amount of "starter" in your jar and a bit less than that of water. It should be a muffin batter consistency. You are aiming for seeing bubbles and your starter doubling. When you get more than 1/2 cup of "starter" you are best to discard extra so you are only "feeding up" a small amount. Once your "starter" doubles within 24 hours it is good to go.
I've been using the same starter that Kate gave me in about 2016 and even when I go away for a month I'm still able to revive it using this method.
Dianne G Hunter
What does this mean?
"Bake for 20 minutes, flip around and bake another 20 minutes."
Just turn the pan around 180° in the oven?
[email protected]
Yes, just turn the pan around.
Tara
I’m a little confused.. I made the pre-ferment last night. Woke up and mixed the dough this morning, let it rise 2-3 hours, punched it down, kneaded it and let it rise again for another 2 hours. Was I supposed to let it rise twice, before shaping and putting in to the loaf pan?
Kandace Huston
When it says flip around and bake do I just turn the pan or do I flip the half cooked loaf over?
[email protected]
You turn the pan 180 degrees. As you said, just turn the pan.
Casey Faulkner
Help! My loaf is super squat and dense. I am not new to sourdough but wanted something less involved and particular than so many recipes. I thought for sure this was it. My dough was very wet/slack. Very. I added so much extra flour but didn’t want to ruin it as mentioned in the post. The crust on the sides is super hard, the whole loaf is about 2.5 inches tall and the top is all cracked and looks like a dried mud puddle! If anyone has any ideas, please reply! 🙁
[email protected]
Hmm I'm really not sure what happened there! Sorry about that. Maybe someone else will have an idea. The recipe produces a very hydrated loaf which is what adds to it's light and fluffy texture. I would suggest try again?
Julia
Do you have a video on how to properly shape and work the dough? I feel alittle confusing and would love to see the process done
[email protected]
f you watch this video of Kate's friend's, she shows how to shape bread at 29:16 minutes
https://www.youtube.com/watch?v=B8o18K7ycuw&t=1950s
Pat
I did the overnight
I see it did rise overnight because the side of the bowl was obvious and the cover also. It fell and I have a blob of a very stick mess.
It is not workable. It was so beautiful when I went to bed but, obviously I’ve done something wrong. I’m sure it’s not salvageable so do I throw it out and start over?
[email protected]
Sounds like it was in a spot that was too warm. If you are doing the overnight rise, you can also skip warming up the milk mixture. This will help with your second rise. It's about finding that sweet spot for temperature with sourdough. I love this recipe. Good luck.